Respond
You can respond to any Activity with one of the following responses:
Respond with a quote or a response
Respond with "No Quote" or "No Response"
Note
To remain in compliance, you should respond to every Activity that you are eligible for. A "No Quote" or "No Response" response is a valid response to maintain compliance.
To Respond to CIO-SP3 or CIO-SP3 Small Business Activity with Documents Only
You can respond all Activity types in CIO-SP3 and CIO-SP3 Small Business with a quote with documents only
If you are responding to most Activity types in CIO-CS, see To Respond to CIO-CS Activities with a Quote and Documents Only.
If you are responding to a Request For Quote in CIO-CS, you must attach any needed CLINs to the quote. For more information, see To Respond to a CIO-CS RFQ With a Quote with CLINs
On the Activities dashboard click the ID of the order.
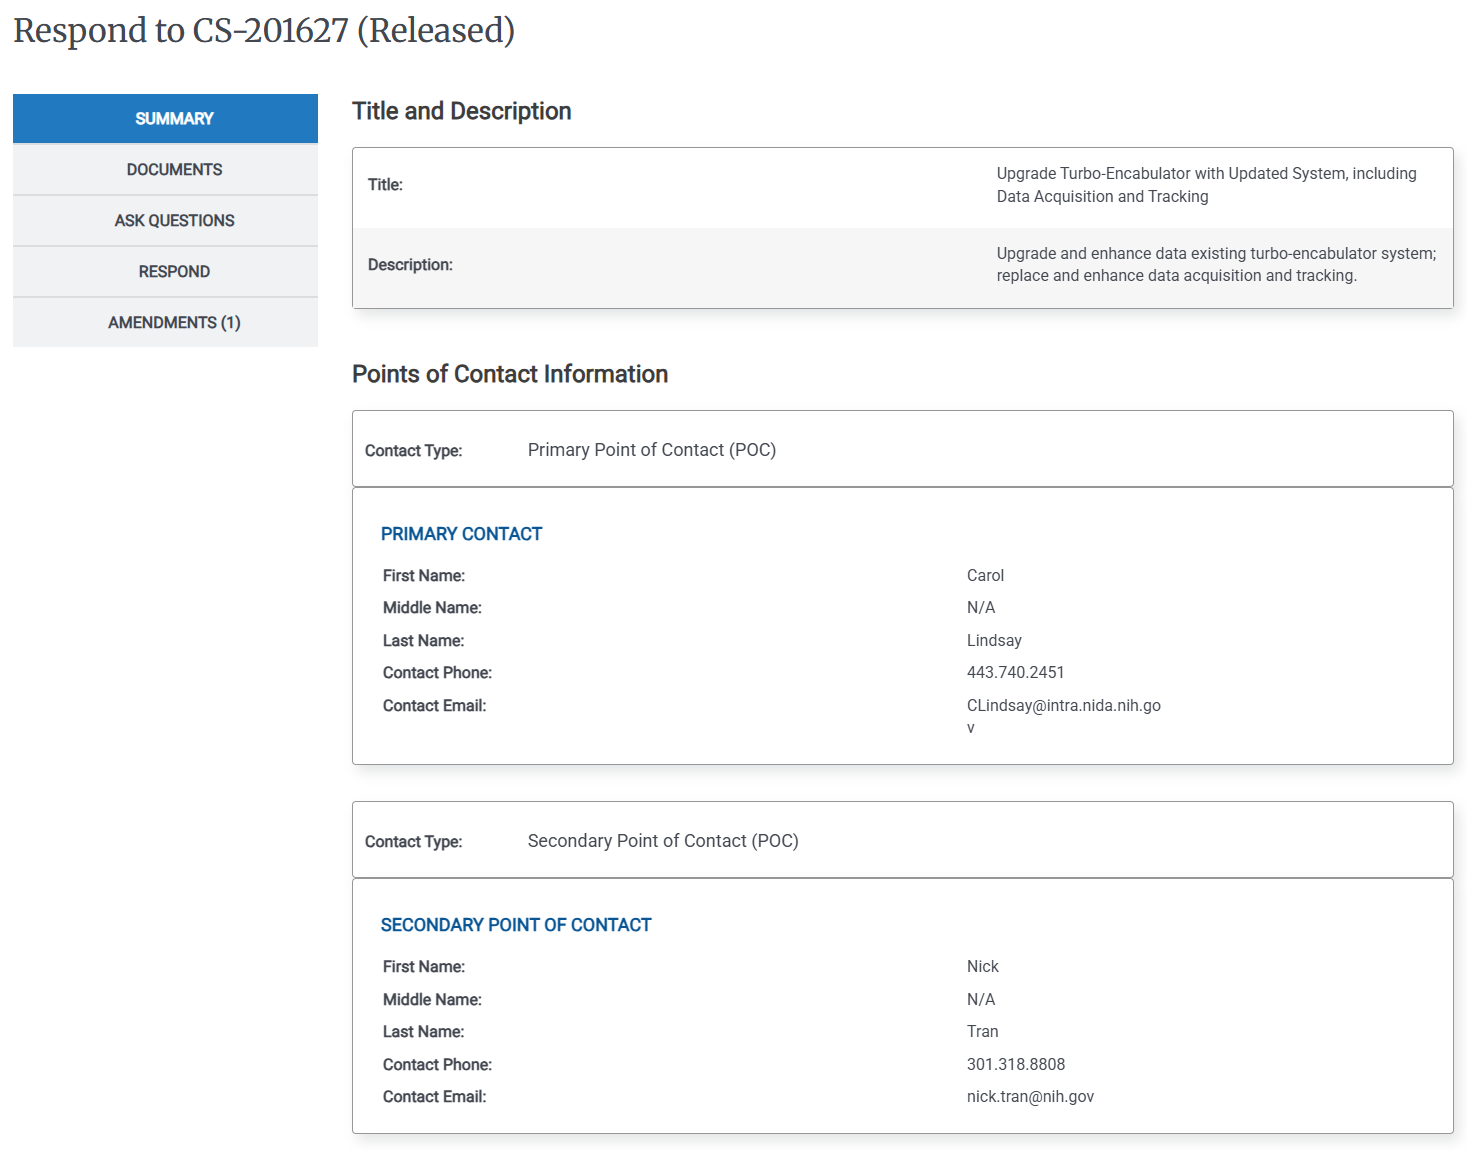
On the Left Rail, click Respond. The Response Status page appears.
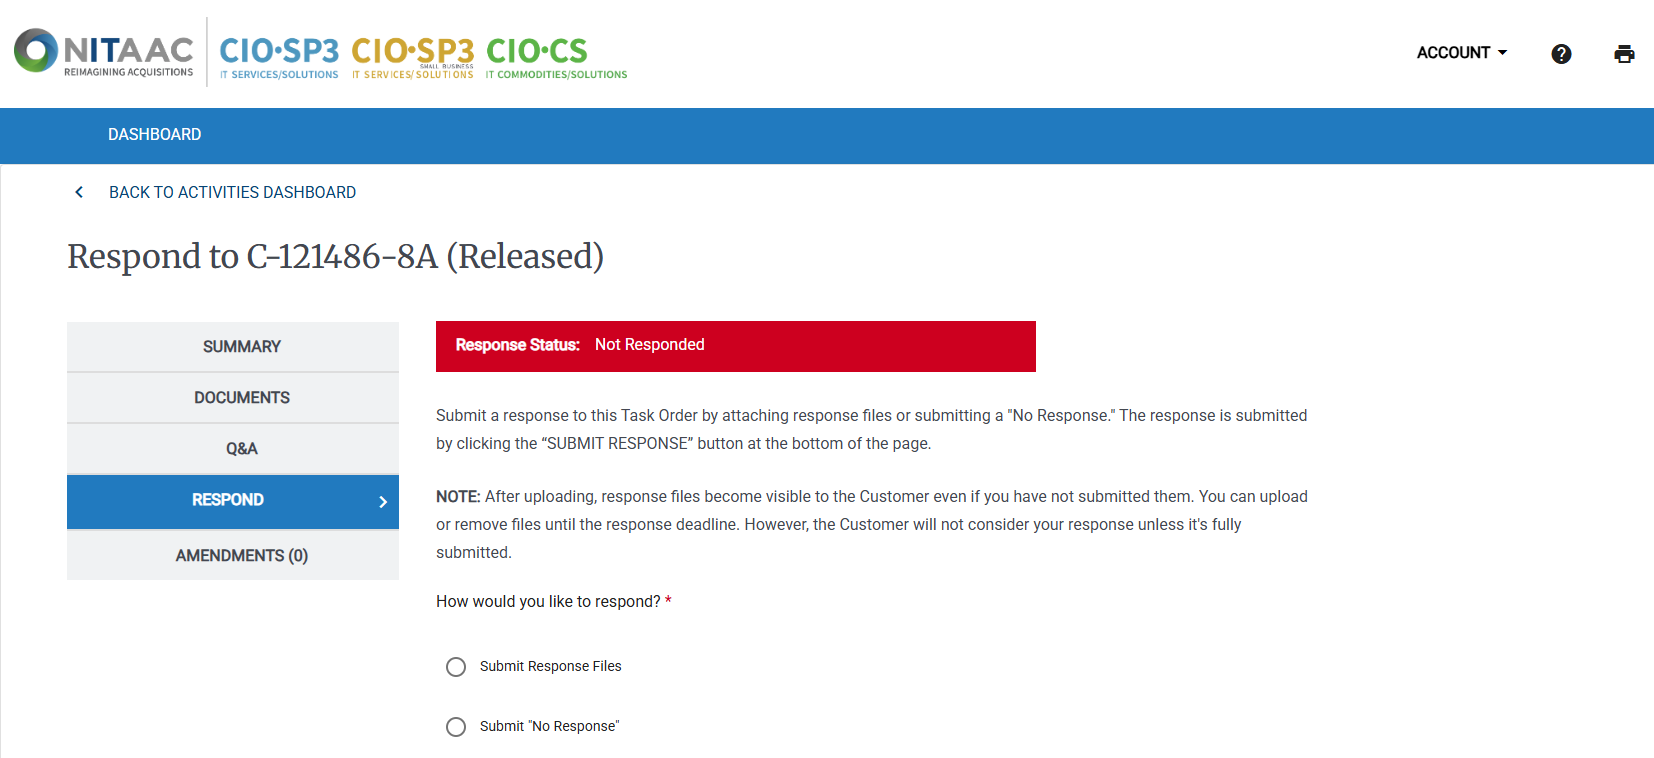
Click Submit Response Files. The Upload File(s) page appears.
Do the following to upload your quote documents:
In the Response File(s) Verification area, enter the following information:
Number of Files
Total Amount Including NCAF
Select the Contract Access Fee Certification checkbox.
Click Submit Response.
To Respond to a CIO-CS RFQ With a Quote with CLINs
When you respond to a CIO-CS RFQ, you attach a quote with CLINs. You can do one or more of the the following to attach the CLINs:
Search for and attach CLINs that are in the Catalog
Submit new CLIN(s) with a TRP
Prepare an Excel (XSLX) file that includes existing CLINs in the Catalog, Prices, and Quantities, then upload it to e‑GOS
If you are responding to a non-RFQ CIO-CS Activity, see To Respond to CIO-CS Activities with a Quote and Documents Only.
If you are responding to a CIO-SP3 or CIO-SP3 Small Business Activity, see To Respond to CIO-SP3 or CIO-SP3 Small Business Activity with Documents Only,
On the Activities dashboard click the ID of the order.
On the Left Rail, click Respond. The Response Status page appears.
Click Build Quote.
Do one or more of the following to attach CLINs to your quote:
Click Search & Attach CLIN(s) in Catalog
Click Search & Attach CLIN(s) In Catalog.
Enter the item to search for in the Search for Approved CLIN(s) field.
Tip
You can search by name, description, or ID. To narrow your search, select a filter from the drop-down list.
Click Search.
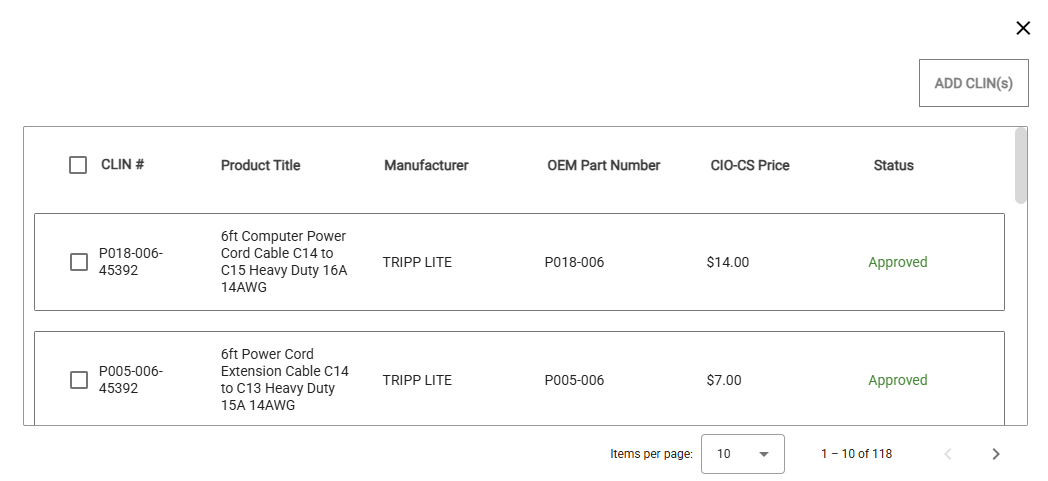
In the Search Results dialog, select one or more CLINs to add, then click Add CLIN(s).
Tip
You can click the Items per page drop-down list to control how many items appear in the list. By default, 10 items appear at a time.
You can click < to view the previous page of items or > to view the next page.
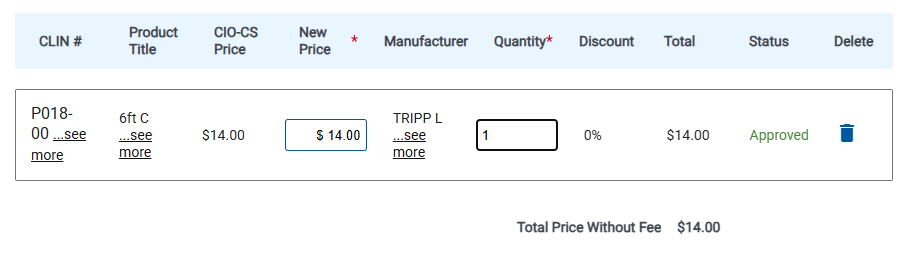
In the Attach CLIN(s) page, enter the price per item in the New Price field, then enter the Quantity.
Tip
If needed, you can add the same CLIN to the quote multiple times, with different quantities and prices each time. Search for the item again, then select the CLIN, add it and set the unique quantity and price per item.
Click Submit New CLIN(s) Via TRP
Click Submit New CLIN(s) Via TRP.
In the Navigate to TRP Portal pop-up, click Confirm. A new tab opens with the e‑GOS Enter TRP Information page.
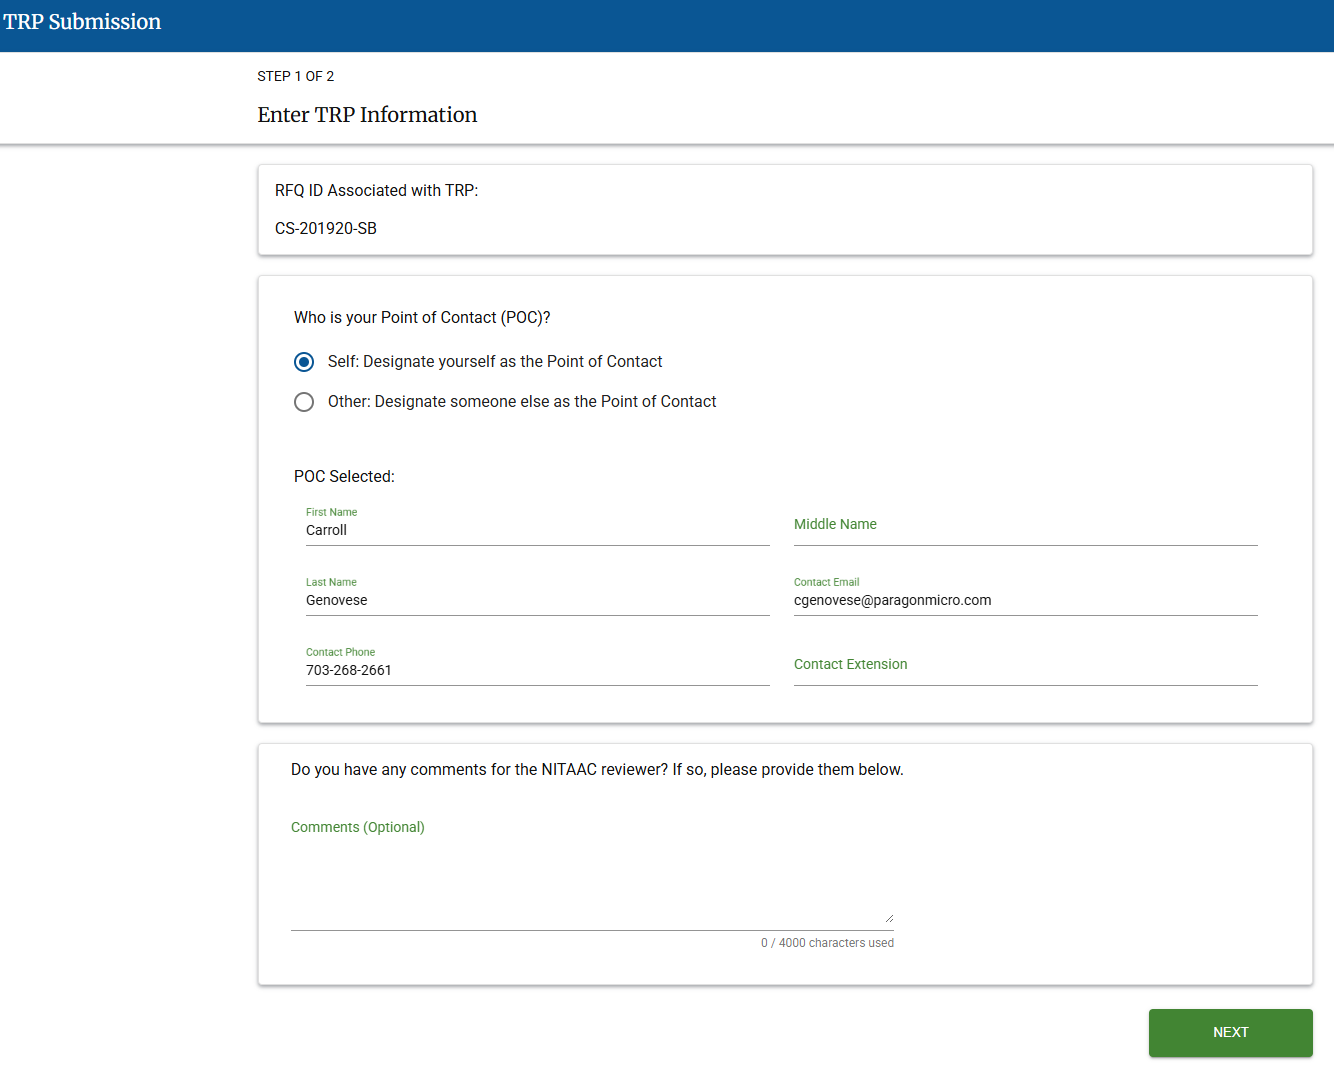
Enter the Point of Contact (POC), then enter any notes for the NITAAC reviewer.
Click Next. The TRP Submission page Step 2 Of 2 appears.
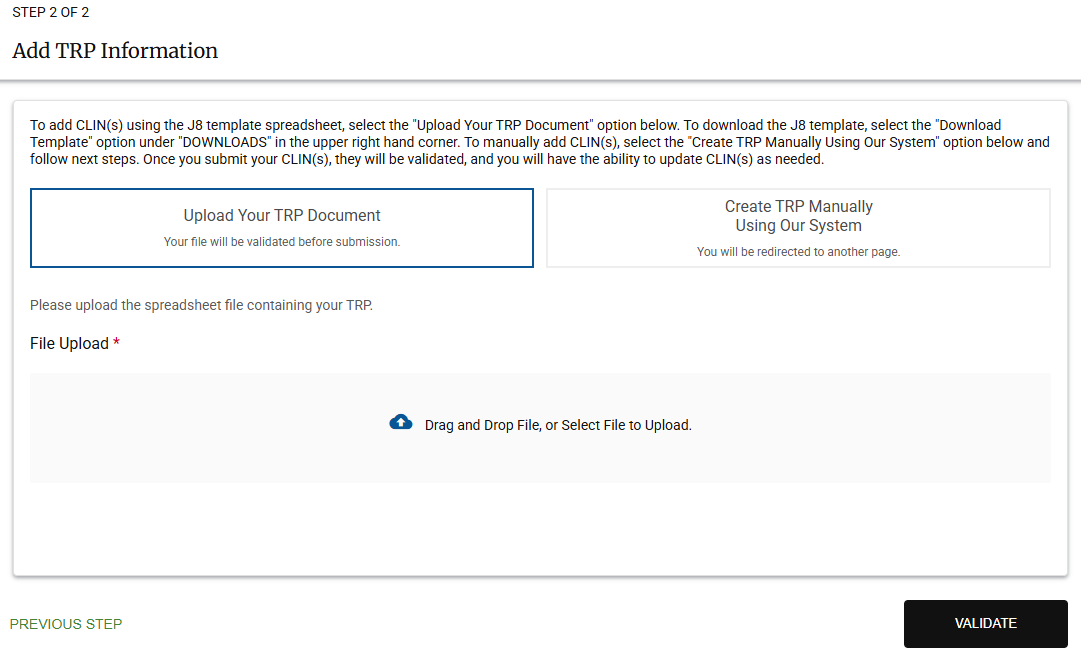
Use one of the following methods to add the TRP:
Bulk upload using the J8 template.
Tip
The J8 template includes instructions to help you complete and use it correctly.
Click Upload Your TRP Document.
Use the Drag and Drop File, or Select File to Upload to add a J8 file to upload.
Note
A message appears that the file is being validated.
Click Validate. The Validation Results pop-up appears.
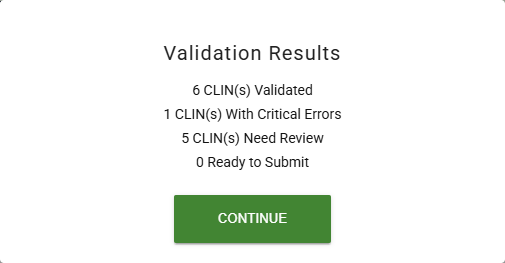
Note
The Validation Results pop-up includes the number of CLINs in each status.
Click Continue.
Manual creation of a single CLIN
Tip
Manual creation can be used to add a CLIN to an in-process bulk upload.
Click Create TRP Manually Using Our System.
Enter data for all required fields on the Add New CLINs screen.
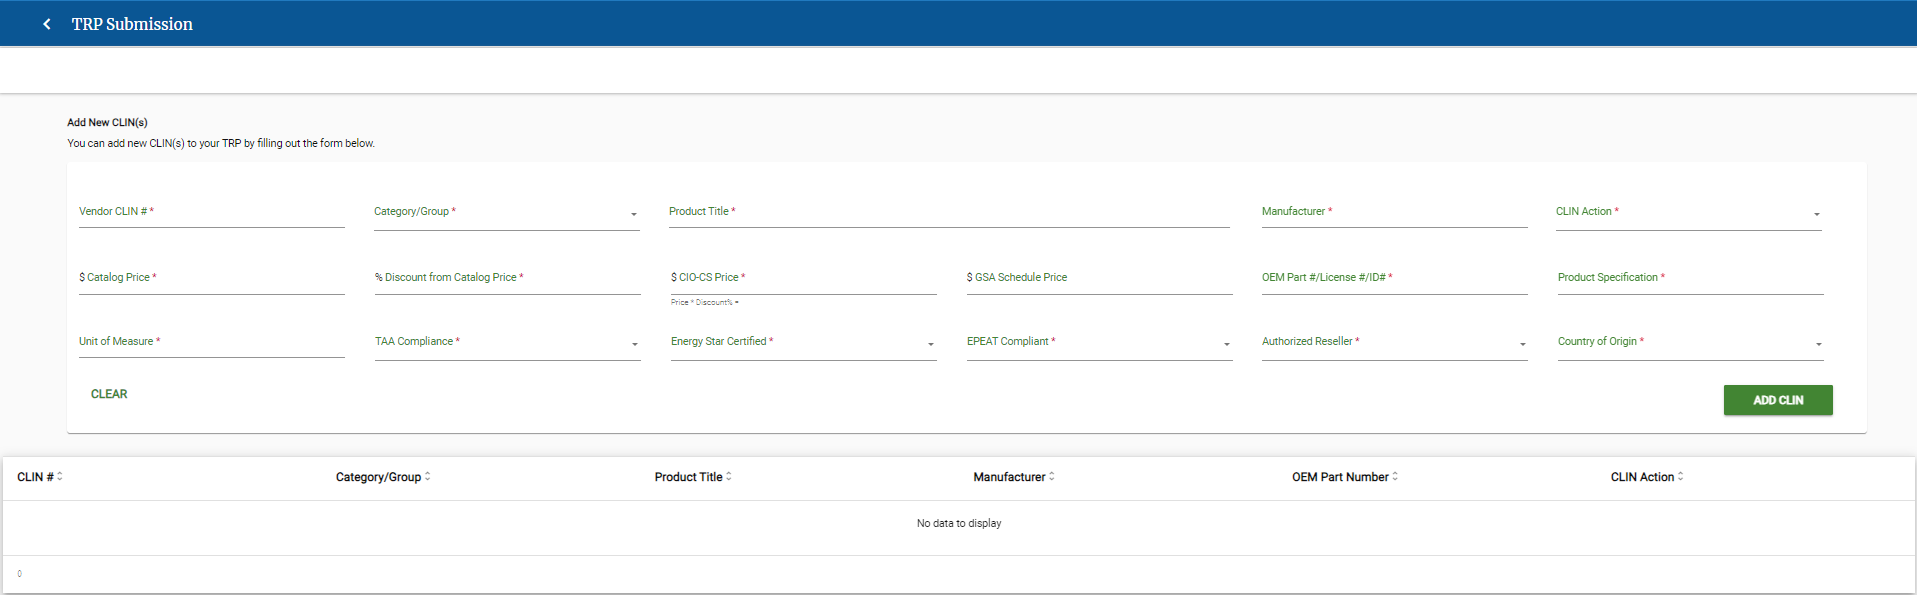
Note
Required fields are marked with an *.
Click Add CLIN.
Note
The CLIN is added to the list of CLINs for submission.
Perform the following actions for each CLIN as needed.

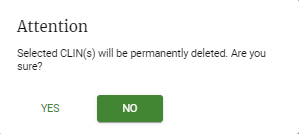
Delete CLINs
Attach Files
Click
 for a CLIN.
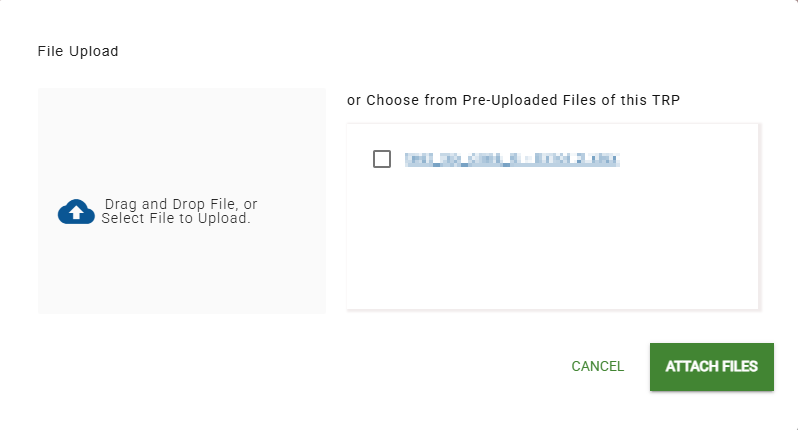
Click Attach Documents. Use the File Upload pop-up to upload any needed files.
In the File Upload page, do one of the following:
Drag and drop one or more files to upload to the Drag and Drop File area.
Click Drag and Drop File, or Select File to Upload and select one or more files to upload.
In the Choose from Pre-Uploaded Files of this TRP area, select the checkbox for any file that you want to attach.
Tip
When you upload a file, it appears in the Pre-Uploaded files area, with its checkbox selected.
Click Attach Files.
Verify that the file(s) are in the Supporting Documents Attachments for the CLIN.
Click Save Changes.
Tip
You can click Cancel Changes to remove your changes.
For each CLIN, do the following:
Click Validate. The Validation Results pop-up appears.
Note
The Validation Results pop-up includes the number of CLINs in each status.
Click Continue.
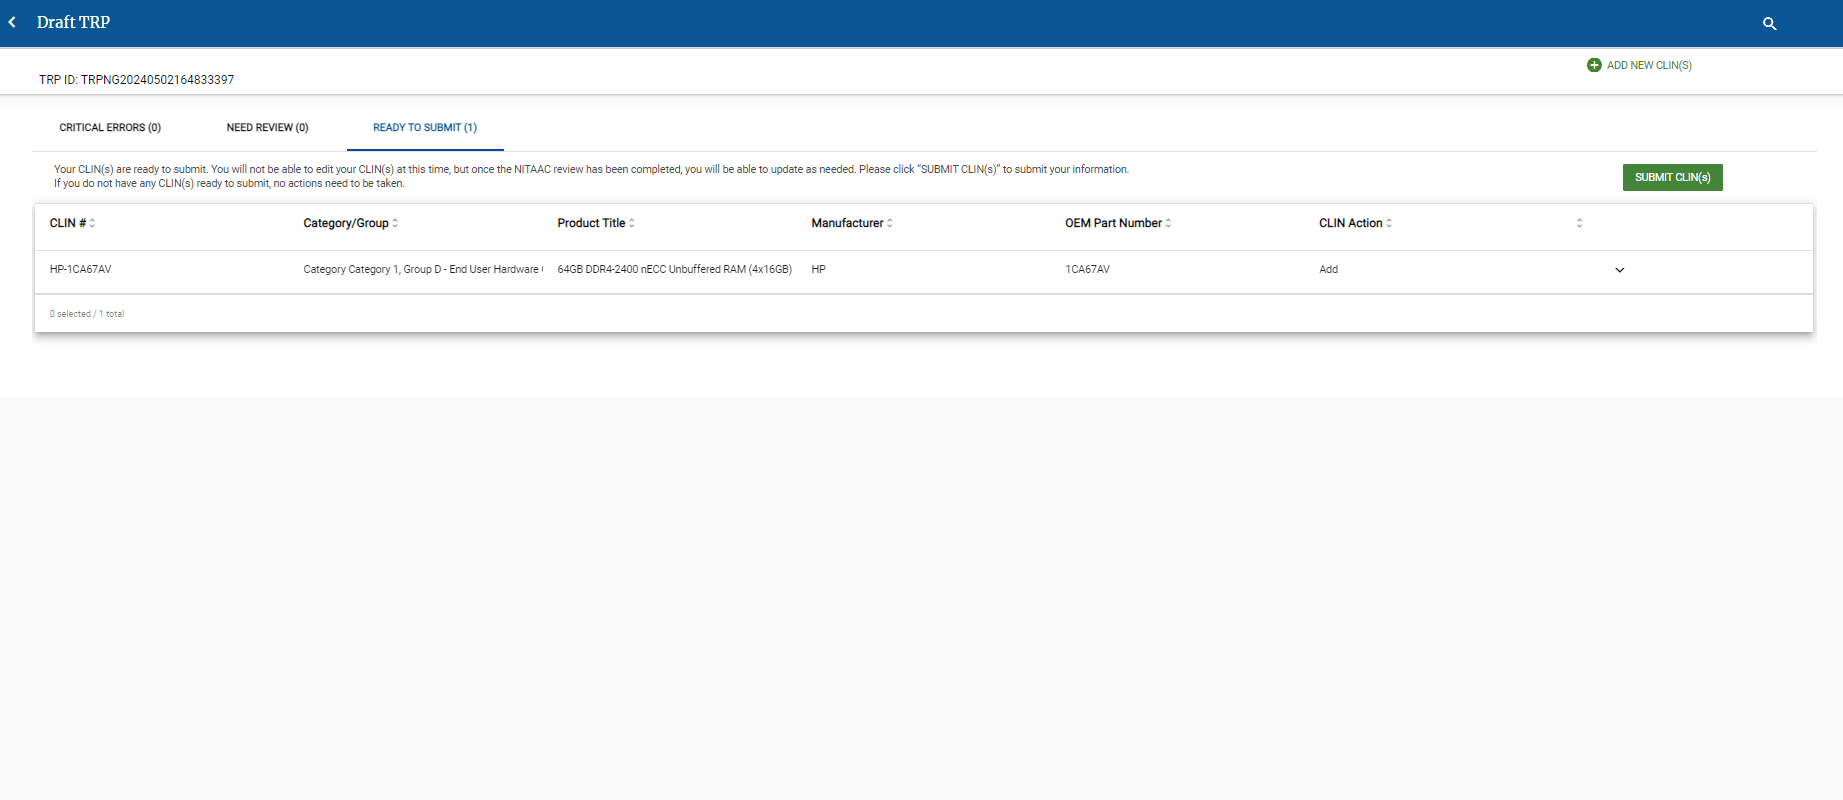
When you've uploaded or created the TRP, the Draft TRP page appears.
A Draft TRP displays CLINs in different validation statuses.
Important
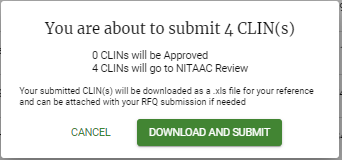
You can only submit a CLIN if the status is Ready to Submit,
Review the following for instructions for each status to get each CLIN to Ready To Submit status.
Critical Errors: CLIN(s) received errors. You must correct the errors before they can be moved to Need Review.
On the Critical Errors tab, click
to view the details for the CLIN.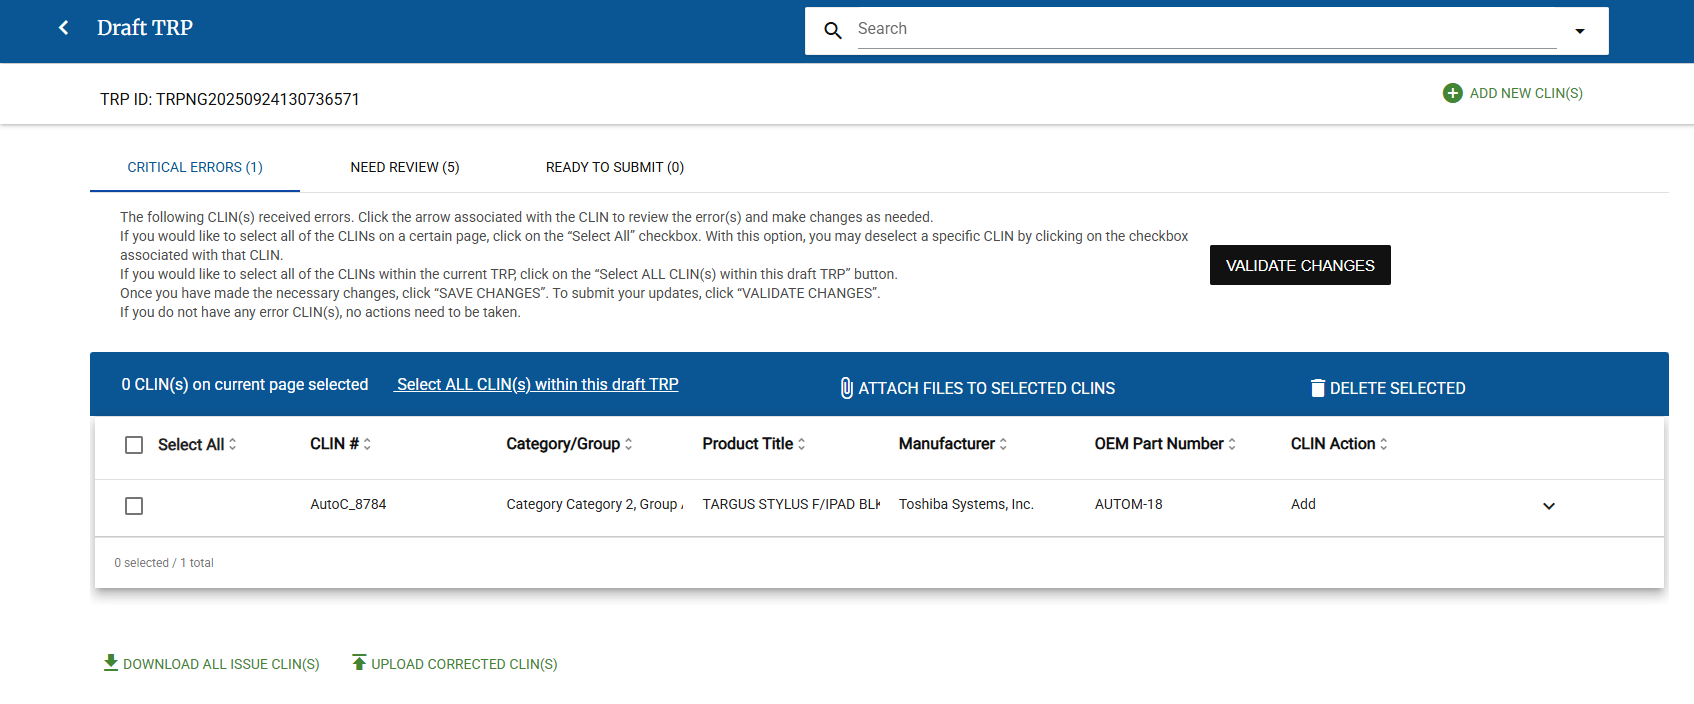
Review messages for the CLIN
Note
Example Message: In this example, the CLIN already exists, and is under review. Updates cannot be made to a CLIN that is under review.

Make necessary corrections for fields in the CLIN, if applicable. Depending on the CLIN issue, you may need to do one or more of the following for each CLIN:
Tip
Click Read more for any item below to see complete instructions for that process.
Edit CLIN Data
Click
to view the details for the CLIN.Review messages for the CLIN.
Note
Sample Message: In this sample, documentation is needed for submission.

Make necessary corrections for fields in the CLIN, if applicable.
Click Save Changes. A green bar appears next to the details drop-down (
) for the CLIN and the Validate Changes button is now available.
Correct CLINs Using Excel
Attach Files to a Single CLIN
Click
for a CLIN.Click Attach Documents. Use the File Upload pop-up to upload any needed files.
In the File Upload page, do one of the following:
Drag and drop one or more files to upload to the Drag and Drop File area.
Click Drag and Drop File, or Select File to Upload and select one or more files to upload.
In the Choose from Pre-Uploaded Files of this TRP area, select the checkbox for any file that you want to attach.
Tip
When you upload a file, it appears in the Pre-Uploaded files area, with its checkbox selected.
Click Attach Files.
Verify that the file(s) are in the Supporting Documents Attachments for the CLIN.
Click Save Changes.
Attach Files to Multiple CLINs
Select the checkbox (
 ) for all each CLIN you want to attach files.
Tip
If all the CLINs on the Draft TRP need the same attachments, click Select All.
Click Attach Files to Selected CLINs. Use the File Upload pop-up to upload any needed files.
In the File Upload page, do one of the following:
Drag and drop one or more files to upload to the Drag and Drop File area.
Click Drag and Drop File, or Select File to Upload and select one or more files to upload.
In the Choose from Pre-Uploaded Files of this TRP area, select the checkbox for any file that you want to attach.
Tip
When you upload a file, it appears in the Pre-Uploaded files area, with its checkbox selected.
Click Attach Files.
Verify that the file(s) are in the Supporting Documents Attachments for the CLINs.
Delete CLINs
Repeat as needed for each CLIN.
Click Validate. The Validation Results pop-up appears.
Note
The Validation Results pop-up includes the number of CLINs in each status.
Click Continue.
Need Review: One or more CLIN(s) need a final review before they can move to Ready to Submit.
On the Need Review tab, click
to view the details for the CLIN.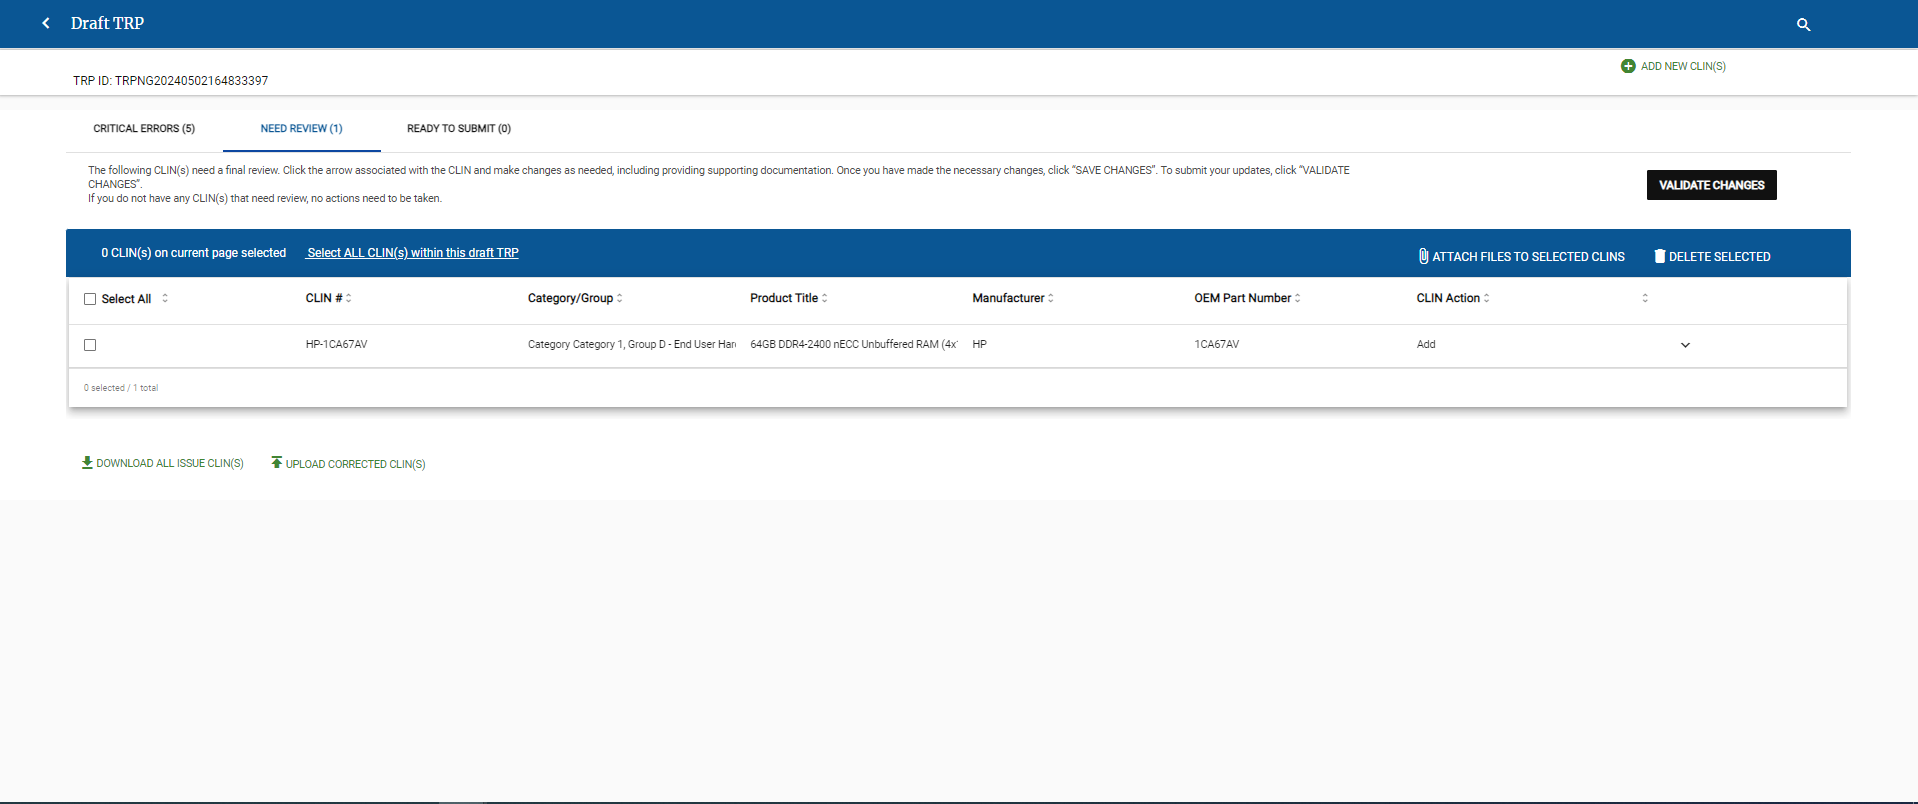
Review messages for the CLIN
Note
Sample Message: In this sample, documentation is needed for submission.
Make necessary corrections for fields in the CLIN, if applicable. Depending on the CLIN issue, you may need to do one or more of the following for each CLIN:
Tip
Click Read more for any item below to see complete instructions for that process.
Edit CLIN Data
Click
to view the details for the CLIN.Review messages for the CLIN.
Note
Sample Message: In this sample, documentation is needed for submission.
Make necessary corrections for fields in the CLIN, if applicable.
Click Save Changes. A green bar appears next to the details drop-down (
) for the CLIN and the Validate Changes button is now available.
Correct CLINs Using Excel
Attach Files to a Single CLIN
Click
for a CLIN.Click Attach Documents. Use the File Upload pop-up to upload any needed files.
In the File Upload page, do one of the following:
Drag and drop one or more files to upload to the Drag and Drop File area.
Click Drag and Drop File, or Select File to Upload and select one or more files to upload.
In the Choose from Pre-Uploaded Files of this TRP area, select the checkbox for any file that you want to attach.
Tip
When you upload a file, it appears in the Pre-Uploaded files area, with its checkbox selected.
Click Attach Files.
Verify that the file(s) are in the Supporting Documents Attachments for the CLIN.
Click Save Changes.
Attach Files to Multiple CLINs
Select the checkbox (
) for all each CLIN you want to attach files.Tip
If all the CLINs on the Draft TRP need the same attachments, click Select All.
Click Attach Files to Selected CLINs. Use the File Upload pop-up to upload any needed files.
In the File Upload page, do one of the following:
Drag and drop one or more files to upload to the Drag and Drop File area.
Click Drag and Drop File, or Select File to Upload and select one or more files to upload.
In the Choose from Pre-Uploaded Files of this TRP area, select the checkbox for any file that you want to attach.
Tip
When you upload a file, it appears in the Pre-Uploaded files area, with its checkbox selected.
Click Attach Files.
Verify that the file(s) are in the Supporting Documents Attachments for the CLINs.
Delete CLINs
Repeat as needed for each CLIN.
Click Validate. The Validation Results pop-up appears.
Note
The Validation Results pop-up includes the number of CLINs in each status.
Click Continue.
Ready to Submit: The CLIN(s) are ready to submit.
Click Bulk Upload CLIN Template
Click Bulk Upload CLIN Template.
Add the CLINs, quantities, and prices that you want to include in the response to a CLIN Template file.
For more information about adding items to the CLIN Template, see To Add Items to a CLIN Template to Upload in a Response.
Click Select File to Upload.
Locate the file, select it, and click Open.
The e‑GOS system verifies that the entries in the file are valid. If it detects any errors, a warning message appears. If one or more CLIN(s) were not found, if there are duplicate CLIN(s), or if there is an error in the upload file, your browser automatically downloads a file with the items that have errors. Close the pop-up window and the Respond page appears.
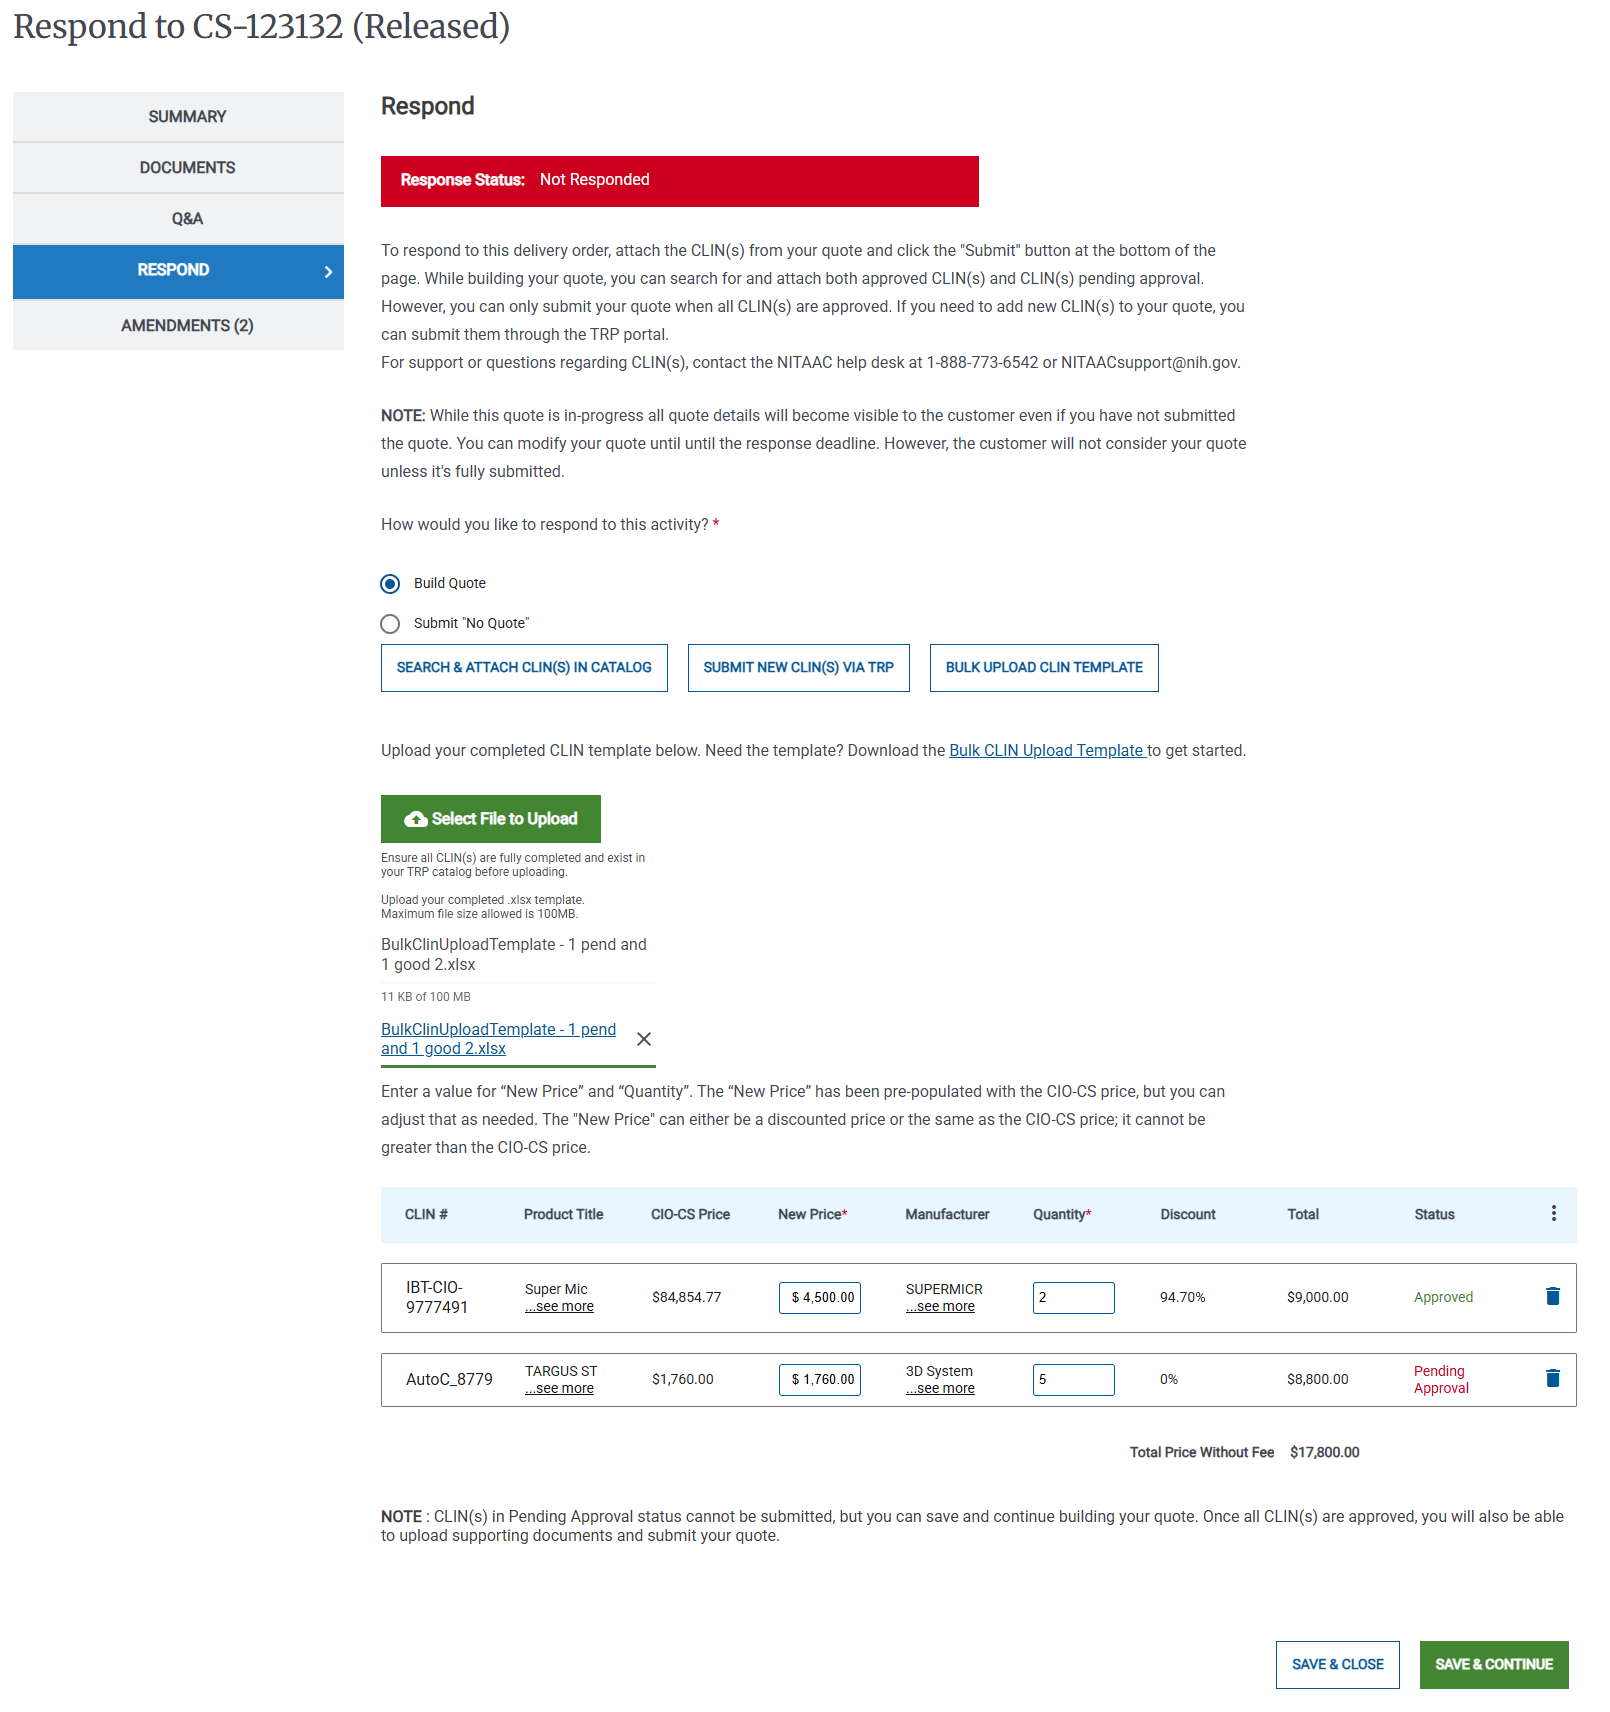
In the table, verify that the CLIN, the new price, and the quantity are correct for each item.
Note
If any items are Pending Approval, you cannot submit them. You can save the quote and continue to build it. When the items are approved, you can submit the response.
If you have CLINs in the Bulk Upload file that are not in your catalog, an error appears, and the e‑GOS automatically places an error file in your browser's Downloads folder. Column D in the error file describes the errror. You can correct the errors in the file, then upload the corrected file.
Do the following to upload your supporting documents:
Click Save & Continue. The Respond page appears.
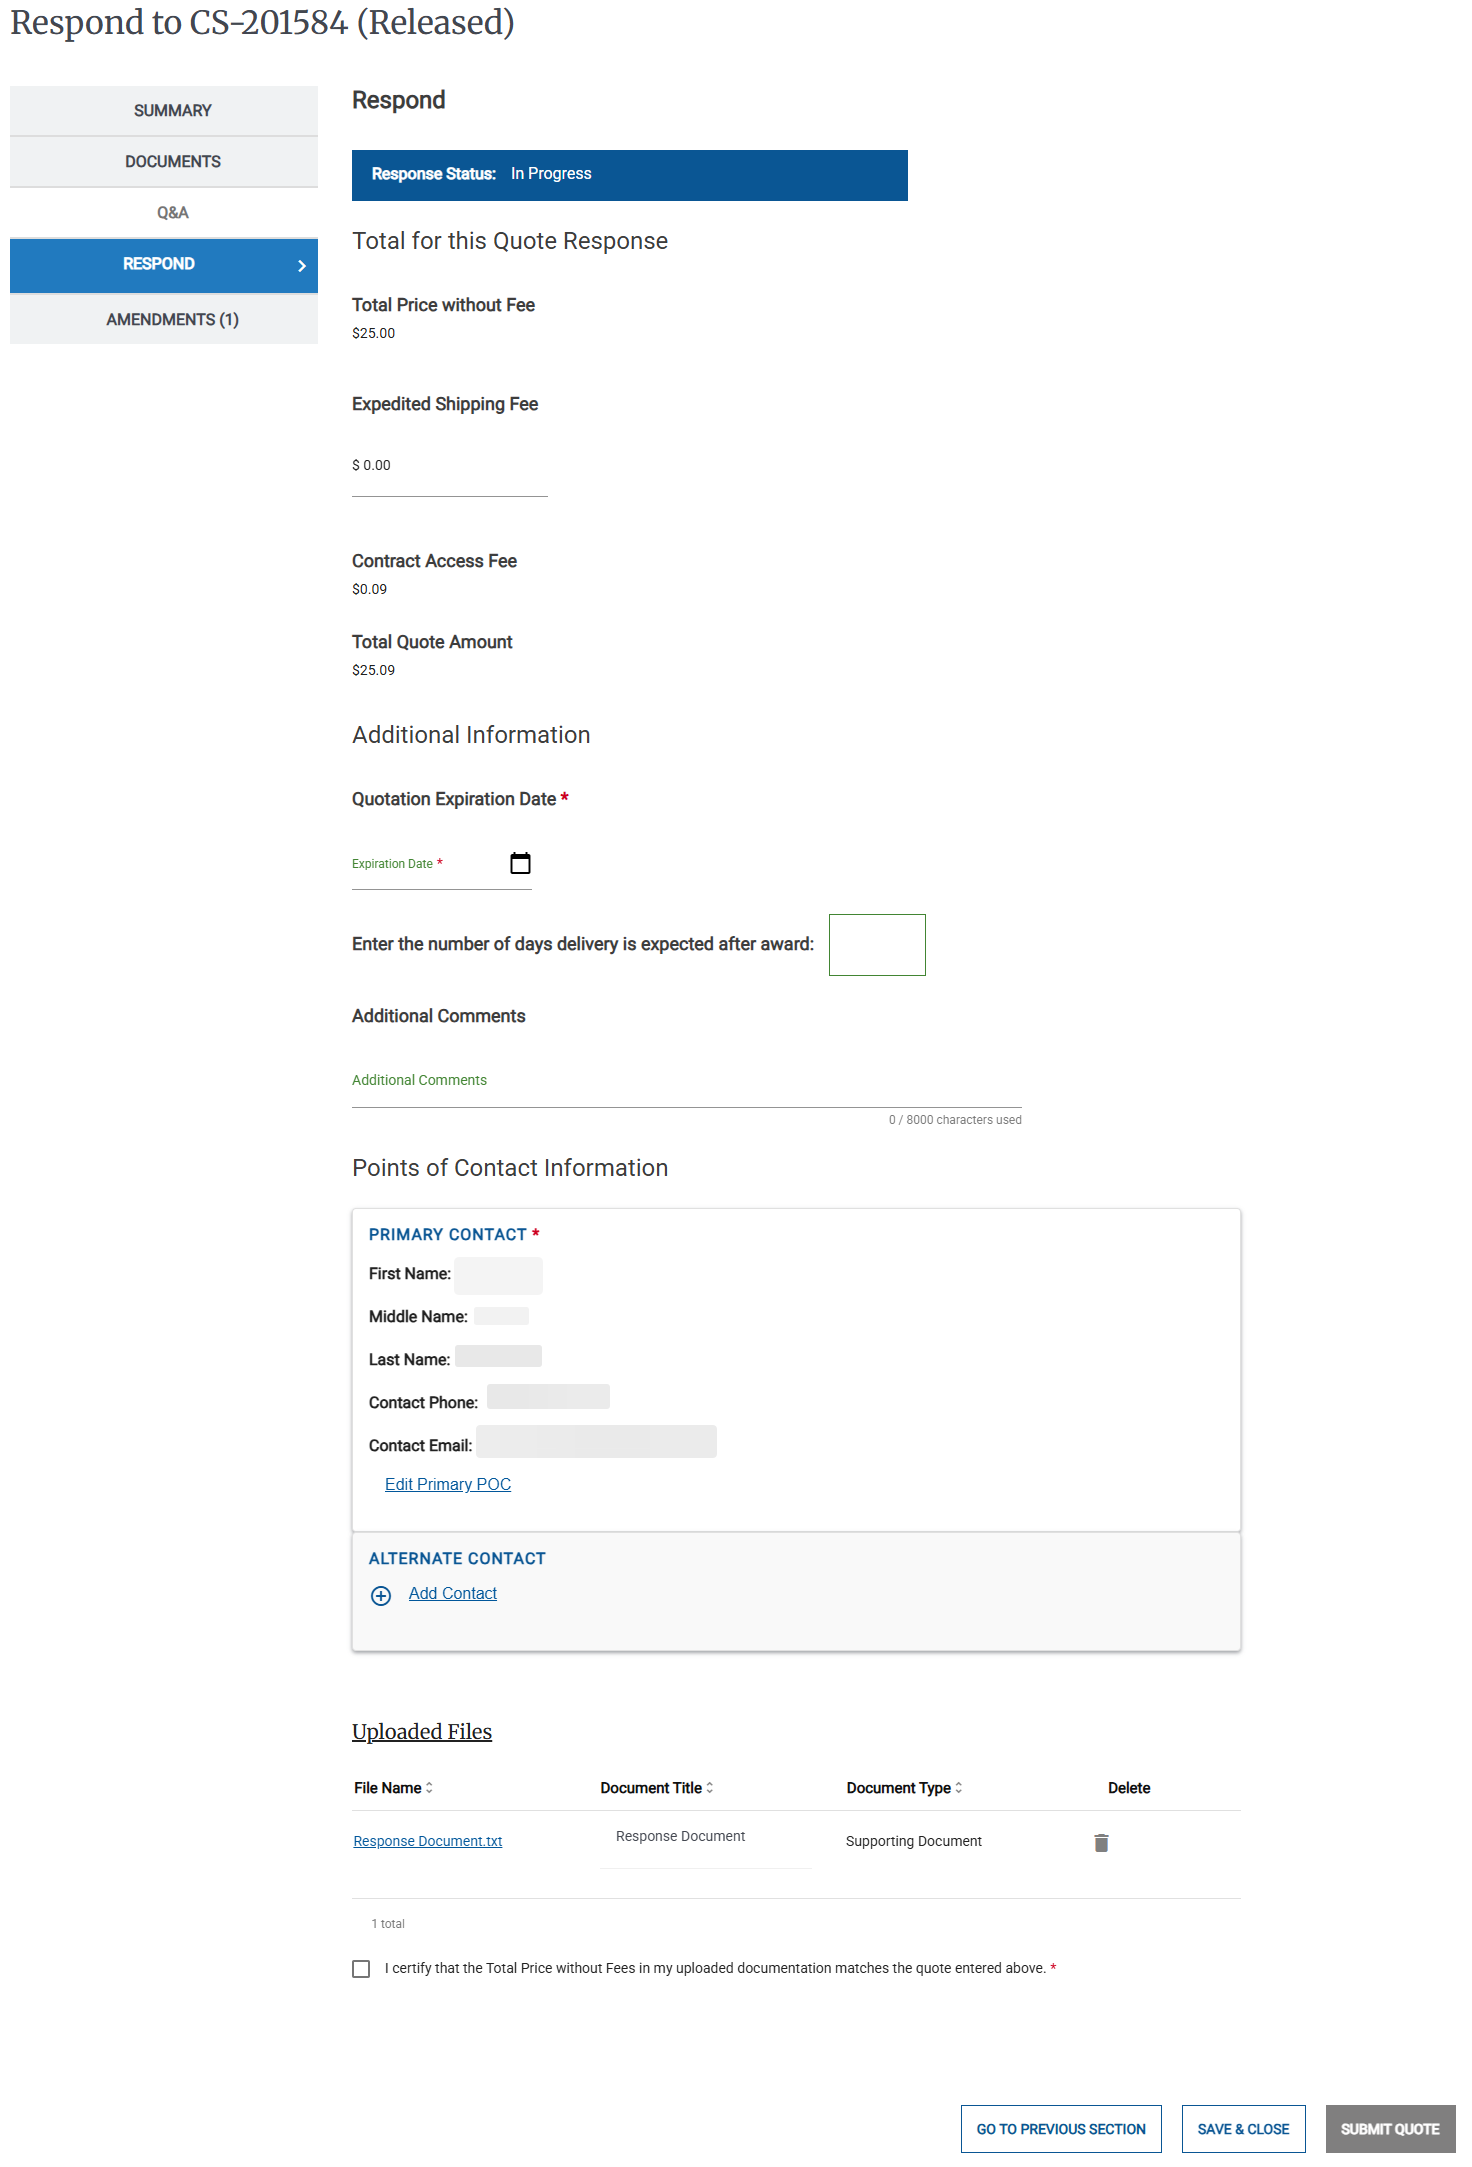
In the Respond page, do the following:
If there is an expedited shipping fee, enter it in the Expedited Shipping Fee field
Select the Quotation Expiration Date
In the Enter the number of days... field, enter the number of days between the award and delivery
Optionally enter any additional comments in the Additional Comments field.
If needed, click Edit Primary POC and select a different Primary point of contact
If needed, click Add Contact and select an alternate contact
Select the I certify that the Total Price without Fees in my uploaded documentation matches the quote entered above checkbox
Click Submit Quote.
The e‑GOS system generates the proposal document as a PDF file and your browser downloads it. Check your browser's Downloads folder for the document. The Activities dashboard appears.
To Add Items to a CLIN Template to Upload in a Response
When you prepare a response to an RFQ, you use a file to add items that are in the catalog to the response. The file includes the following information for each item that you want to add to the response:
Item CLIN
New Price for this Response
Quantity of the item in this Response
The New Price is optional. If you include it, the New Price should be equal to or lower than the price in the Catalog. If you do not enter a New Price for an item, e‑GOS uses the existing price in the Catalog.
The e‑GOS system uses the CLIN in the file to match to an existing approved CLIN.
Note
You can only add the CLINs for items that are already in the Catalog. If you need to add new items, you should create a TRP.
When the upload is complete, you can download a copy of the file with any errors noted in a separate column.
Do one of the following to download the template:
In the Bulk Upload CLIN Template page, click Bulk CLIN Upload Template
Click this link to download the template: Bulk CLIN Upload Template
Locate the template in your browser's Downloads folder and open it.
In the Template, do the following for each item that you want to include in the response:
Enter the item CLIN
Optionally, enter a New Price for the item
Enter the item quantity
Tip
Each item should be on a separate row. There should not be any blank rows. The e‑GOS system, ignores any content in columns E and higher. If needed, you can sue these columns for your own purposes.
Save the file. You may wish to change the file name when you save it.
To Respond to CIO-CS Activities with a Quote and Documents Only
You can respond to a quote with documents only for the following CIO-CS Activity types:
Draft Request For Quote (Draft RFQ)
Request For Information (RFI)
Sources Sought
Special Notice
If you are responding to a Request For Quote in CIO-CS, you must attach any needed CLINs to the quote. For more information, see To Respond to a CIO-CS RFQ With a Quote with CLINs
If you are responding to any Activity in CIO-SP3 or CIO-SP3 Small Business, see To Respond to CIO-SP3 or CIO-SP3 Small Business Activity with Documents Only.
On the Activities dashboard click the ID of the order.
On the Left Rail, click Respond. The Upload Files page appears.
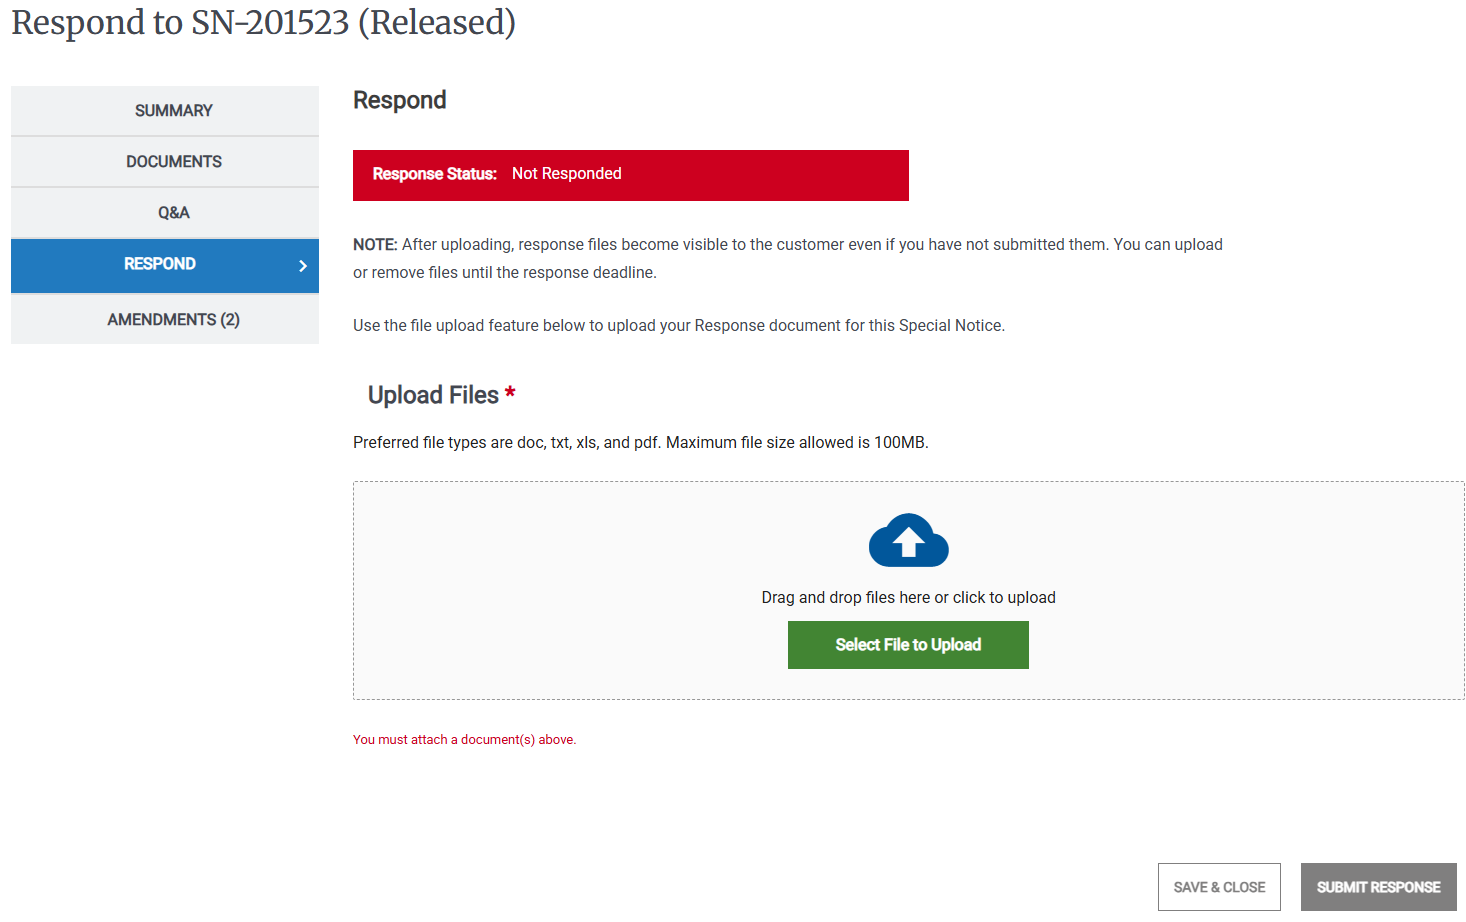
Do the following to upload your quote documents:
Click Submit Response.
To Submit No Response
On the Activities dashboard click the ID of the order.
On the Left Rail, click Respond. The Response Status page appears.
Click Submit No Response, the No Response reason list appears.
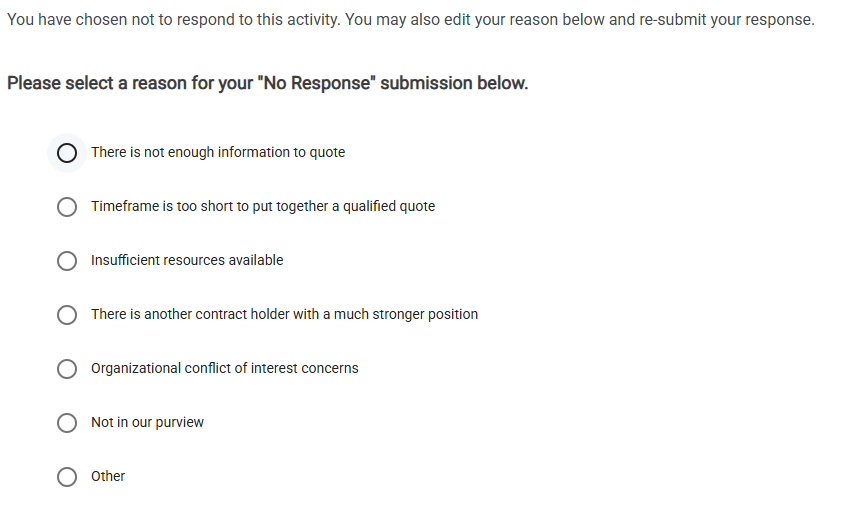
Select the reason for the No Response.
Click Submit Response. The Submit No Response pop-up appears.
Click Submit No Response. A confirmation message appears.
To Submit No Response for Multiple Activities for Different Reasons
On the Activities Dashboard click Submit "No Responses". The Submit "No Response(s)" page appears.
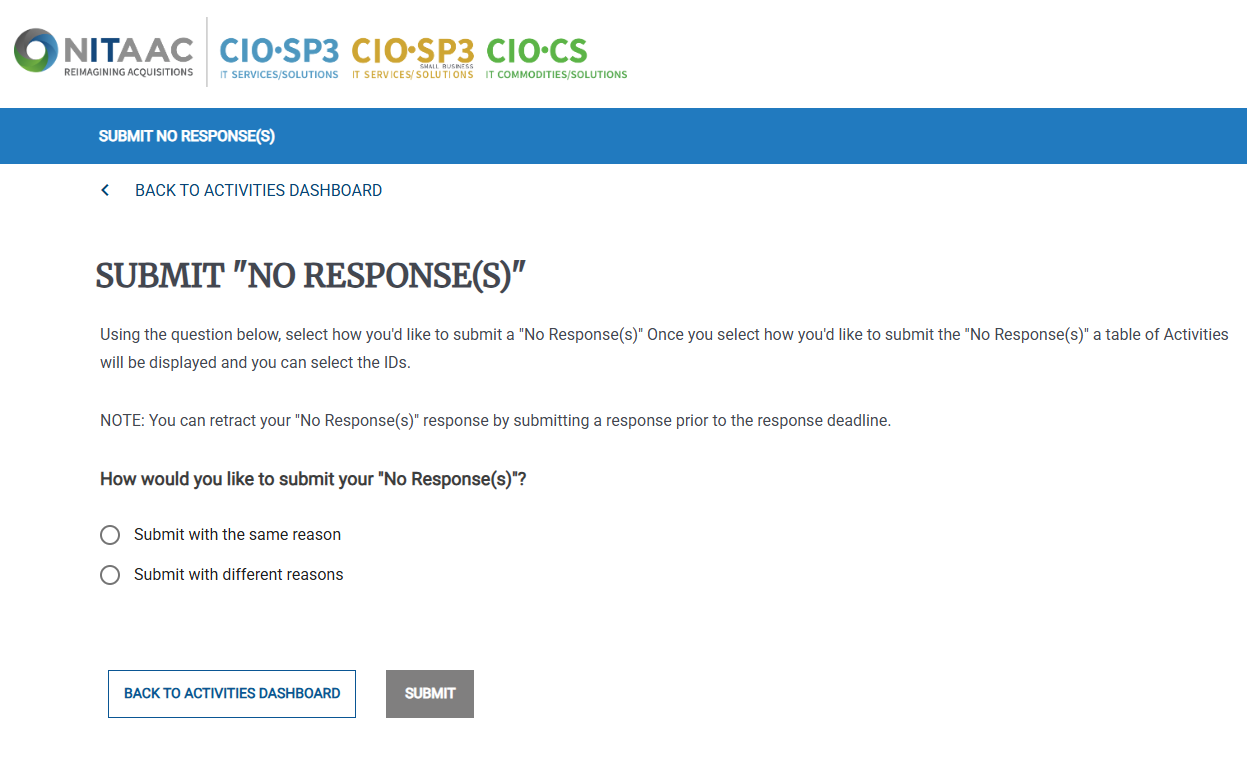
Select Submit with different reasons, The list of eligible orders appears.
Select the checkbox (
) for each applicable order, then select the reason from the Select Reason drop-down list.Note
You can set a different reason for each order that you select.
Click Submit. The Verify your "No Response(s)" responses pop-up appears.
Click Confirm No Response(s). A confirmation message appears.
To Submit No Response for Multiple Activities for the Same Reason
On the Activities Dashboard click Submit "No Responses". The Submit "No Response(s)" page appears.
Select Submit with the same reason, the No Response reason list and the list of eligible orders appears.
Select the reason for your No Response submission.
Select the checkbox (
) for each order you want to respond to.Click Submit. The Verify your "No Response(s)" responses pop-up appears.
Click Confirm No Response(s). A confirmation message appears.